Video Task
The EyesOnIt Camera Analytics page is where you configure a specific camera for EyesOnIt detection. To open it, launch the Video task, select a camera entity, and select the Analytics section on the right. Then select the EyesOnIt Configuration tab.
Every camera gets its own independent configuration, so you have full control over what EyesOnIt does with each one. Changes take effect when you save and resume monitoring.
Page layout
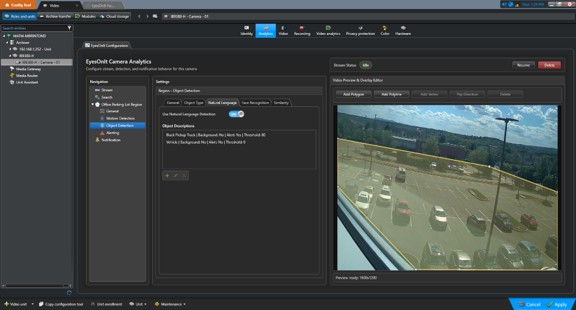
The camera configurationn page shows a settings Navigation tree, a Settings area, and a Video Preview & Overlay Editor.
On the left you will find a navigation tree that lists everything configurable for this camera: the stream settings, search indexing settings, each detection region, any boundary lines you have drawn, and the notification settings. Selecting an item in the tree shows its settings panel in the Settings area.
On the right is the Video Preview & Overlay Editor, which displays live video from the camera. This is where you draw and adjust the regions and lines that define where and how detection runs.
In the top-right corner, the Stream Status bar shows you whether this camera is currently being monitored, and gives you quick access to the Resume, Stop, and Delete stream controls.
Recommended setup sequence
If you are setting up a camera for the first time, working through the settings in this order tends to go smoothly:
- Stream and Search Settings — set the stream name, frame rate, and decide which object families to index for Security Desk search.
- Regions and Lines — use the video preview to draw your detection regions and any boundary lines.
- Detection Settings — configure motion and object detection settings for each region.
- Alerting and Notifications — set the conditions that trigger an alert and connect them to a Genetec event.