
Set up and manage customer workspaces
In the EyesOnIt web UI, a provider administrator sets up each customer in Administration → Organizations. The example uses a standalone shared server and a customer called Campus operations. Have its administrator’s email address, intended cameras, and resource allowance ready.
Create the customer and set limits
Section titled “Create the customer and set limits”- In the provider workspace choose Create organization, enter the customer name, and confirm. If prompted to enroll a provider authenticator, complete account security and return here.
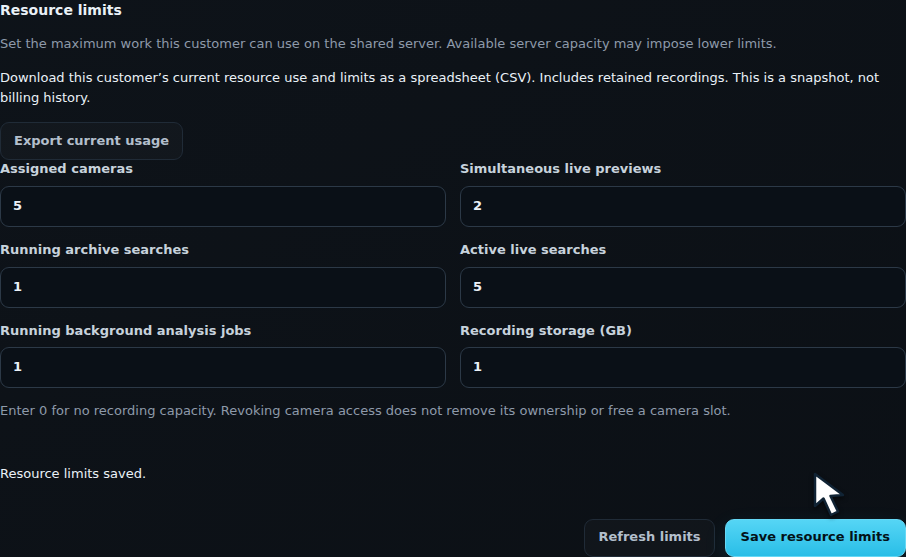
- Select the customer. In Customer setup, choose Review resource limits. Enter limits for assigned cameras, simultaneous previews, running archive searches, active live searches, and background jobs.
- Set Recording storage (GB). An explicit zero is appropriate for a customer who needs no recording capacity. Choose Save resource limits and check for Resource limits saved. If the result is uncertain, choose Refresh limits before editing again.
- Choose Choose cameras, then assign the cameras the customer should own and use. Follow Manage camera ownership to delegate rule editing. Removing a user’s viewing access leaves camera ownership and its budget slot in place.
Invite the administrator and verify handoff
Section titled “Invite the administrator and verify handoff”- Choose Invite administrator. Verify the customer, display name, email, and role. Choose No cameras, Selected cameras, or All organization cameras. The last choice includes cameras assigned to this customer in the future. Choose Send invitation.
- The recipient opens the invitation, chooses their username and password, signs in, and completes the required authenticator setup. Review invitations shows pending or expired invitations. Use Check delivery, Send replacement, or Cancel invitation as appropriate. Use a fallback link only through an approved private channel when the dialog offers it.
- Check for Active. A pending customer activates after its recording allowance has been saved and its first administrator completes account setup. A delivered invitation alone leaves the handoff unfinished.
- Ask the administrator to sign in and check the Customer workspace name, camera list, and a representative live view. For provider-side verification choose Open customer workspace and select the active customer. Use Return to provider workspace when finished. Additional customer users can be invited under Administration → Users → Invite user.

Approve notifications and identity access
Section titled “Approve notifications and identity access”In the customer setup checklist, choose Set up notifications. Review the recipients on a dedicated profile, choose Customer approval, verify the customer, destination and current settings, and approve the profile. A changed profile requires fresh approval. Select the approved profile in the customer’s rule. Coordinate any delivery test with the recipient and confirm arrival. See Notifications and evidence.
To grant access to a shared person, use that person’s Organization access choices in Identities. Verify the target from the intended customer workspace. Manage identity access
Review current usage
Section titled “Review current usage”Select the customer, open Review resource limits, and choose Export current usage to download a CSV snapshot of usage and limits, including retained recordings. Check the measurement column for unavailable storage figures. Use the report alongside Review resource limits when deciding whether to adjust an allowance. Server capacity can further limit simultaneous work.
Suspend, reactivate, or retire the customer
Section titled “Suspend, reactivate, or retire the customer”Open Manage customer and review Customer access. Suspended blocks customer access until reactivation. Archived retires the workspace, preserves data and camera ownership, and leaves retention policies in effect. A save signs out that customer’s current sessions. Review monitoring and recording separately before retiring a customer.
Review the confirmation and choose Save customer changes. To find a retired customer later, enable Show archived organizations. To reactivate it, verify the saved storage allowance, select Active, and check sign-in with the existing permissions and resource limits.
For permanent removal, review linked records first. Delete organization… is available for an archived customer and requires the exact customer name. The server allows deletion only once linked customer data has been removed. If a change has an uncertain outcome, refresh the organization list and verify its current state before repeating it.