
Organize Genetec cameras
Group cameras by the places operators recognize, then choose the views needed for an investigation.
Create an area
Section titled “Create an area”- In Config Tool, open Area view.
- Choose Add an entity → Area.
- Enter the area’s Name, such as Campus walkthrough, and apply the change.
- Check its position in the entity tree. Create child areas for locations such as Campus, Entrances, and Walkways as needed.
- Under Relationships, select Cameras and choose +.
- Select the intended camera in the picker and choose Select. Apply the change.
- Expand the area in the entity tree and verify the camera beneath it.
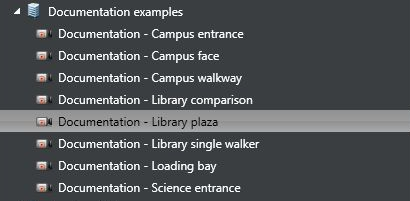
The documentation setup keeps eight sample cameras together in Documentation examples. For a larger campus hierarchy, place the entrance and science-entrance views under Entrances, and the walkway and library-plaza views under Walkways. Check the resulting tree before using it to scope searches.
Select cameras for a search
Section titled “Select cameras for a search”In EyesOnIt Investigation or the Search tab of EyesOnIt Monitoring, expand the camera tree or use Search cameras…. Check the individual cameras you want to search. Leave every camera unchecked only when you intend to search all cameras available to the plugin.
The plugin uses Genetec entities for this tree. The EyesOnIt web UI’s camera folders are configured separately; verify the native tree when following a web UI example.
Continue with Search video.