
Detect people and activity with natural language
Describe one appearance you want EyesOnIt to look for. This campus example watches for a person wearing a yellow top while other people come and go.
Before you start
Section titled “Before you start”Open a camera in Monitor, choose Configure, and select a region covering the walkway or entrance. Use an account with analytics configuration access.
Choose a view where the clothing or carried items in your description are visible. You can also use a description when you search across campus video.
1. Describe the person you want to find
Section titled “1. Describe the person you want to find”For the campus example, use this description:
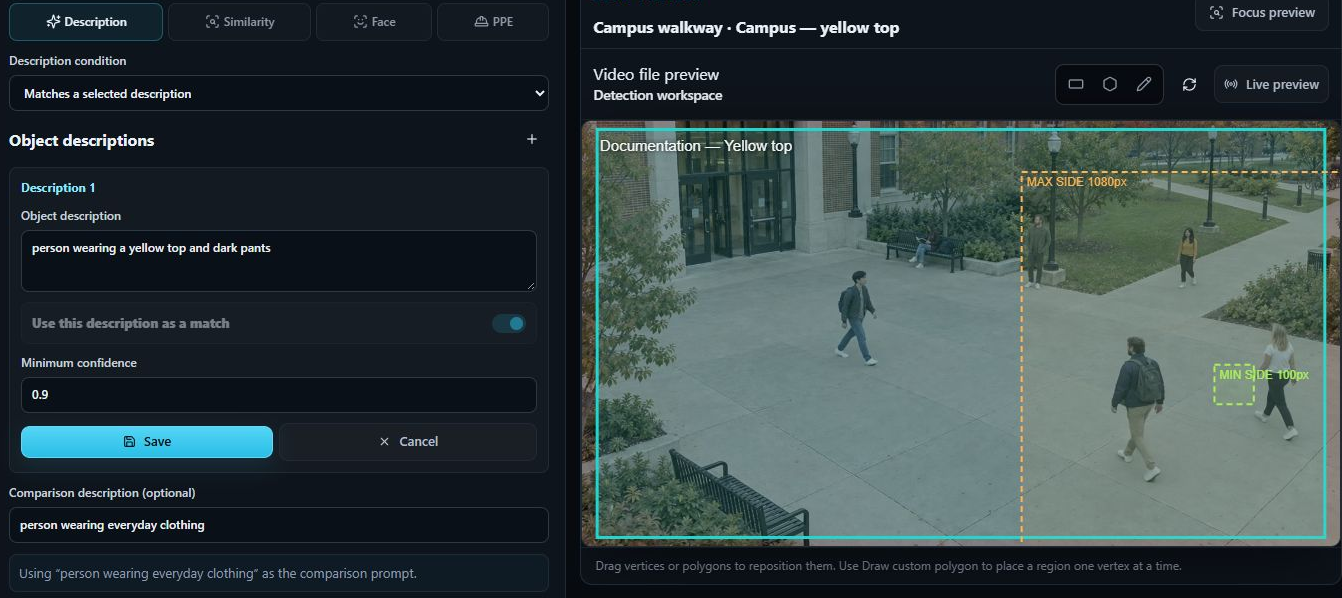
person wearing a yellow top and dark pants
Describe the features that matter in plain language, using colors, clothing, and items a camera can show. The same target description continues to apply as different people enter the view.
Keep the description tied to the task and camera view. Another target might be a person carrying a cardboard box or wearing a red jacket. Use face recognition for an enrolled identity.
2. Configure natural-language matching
Section titled “2. Configure natural-language matching”- Open Detection for the region and add or select a configuration.
- Set Configuration name to Campus — yellow top and keep Configuration enabled on.
- Enable Use object type and select Person. Turn Use object size off for the initial test.
- Select Description under the additional detection options.
- Set Description condition to Matches a selected description.
- Enter the single target description above and keep Use this description as a match on. Set Minimum confidence for the initial test. The illustrated setup uses 0.90 (90%).
- Choose Save in the description card. Set Detection condition to At least one matching object is detected, then read the Detection summary.
The Save button in the description card finishes that edit. Save configuration saves the camera’s complete setup.
Use a broad comparison when needed
Section titled “Use a broad comparison when needed”With one target, EyesOnIt supplies an automatic comparison when Comparison description (optional) is blank. You can enter a broad alternative to suit the task. This example uses:
person wearing everyday clothing
The comparison helps score the target description; it does not create another alerting target. Keep it general so the setup remains useful as new people appear.
3. Test and refine the description
Section titled “3. Test and refine the description”Test video containing the target and video containing ordinary activity without the target. Review the highlighted person and surrounding footage. Check different distances, viewing angles, lighting, and times of day that matter to your operation.
Use Image Lab for individual JPEG or PNG frames. Configure the region and target description, then choose Analyze frame. Follow with moving video to check the rule’s timing and incident evidence.
Refine the wording and Minimum confidence if needed. For this 1080p plaza view, the illustrated setup also uses a 100–1080 px object-size range. Check size bounds against the positions you want to monitor.
For a recurring unwanted match, you can add a description of a broad alternative appearance and turn Use this description as a match off. Keep the main workflow focused on the one appearance you want to detect.
4. Create the incident rule
Section titled “4. Create the incident rule”- Return to the camera’s region and open Rules.
- Select Campus — yellow top as the Detection configuration.
- Name the rule Person wearing a yellow top and keep Rule enabled on.
- Choose Dwell (s) to suit how long the person should remain visible. Set Reset (s), Severity, and Schedule for your procedure. The incident-rule guide explains these controls.
- Choose Save configuration, then Start in Monitor if needed. For a completed video file, choose Run again.
Open Incidents and filter to the camera. Review the snapshot to confirm the highlighted person matches the description.
The illustrated camera rule uses a 1-second dwell, 5-second reset, Review severity, and an Always schedule.
To send an alert or retain video around the event, add notifications and evidence.
Use the description across cameras
Section titled “Use the description across cameras”A saved detection rule watches its configured camera and region. To investigate appearances across several campus views, use the same description in Search video. Choose Archive for indexed history or Live for a temporary watch across selected cameras.
Review clothing and surrounding video together when following appearances between cameras.