
Create a detection and incident rule
Create an incident when the activity you care about occurs. This example detects a person in a work area and applies a 3-second dwell.
Before you start
Section titled “Before you start”Use a camera with a clear view and a saved region. Open Monitor → Configure, then select that region. Your account needs analytics configuration access.
Detection defines what qualifies. Rules defines when it creates an incident and which actions run. A new region may already contain a configuration and rule; review those before adding another.
Watch the walkthrough
Section titled “Watch the walkthrough”Follow this captioned EyesOnIt web UI walkthrough, or use the written steps below.
1. Choose what qualifies
Section titled “1. Choose what qualifies”- Open Detection. Select an existing configuration or use + to add one.
- Set Configuration name to People in the work area and keep Configuration enabled on.
- Enable Use object type and select Person under Object types.
- Start with Minimum object type confidence at 0.5, the example shown here. Adjust it after testing representative video.
- For this first test, turn Use object size off. Add a size range later if you want to filter by the size of the detected box.
- Set Detection condition to At least one matching object is detected. Read the Detection summary to confirm the result.
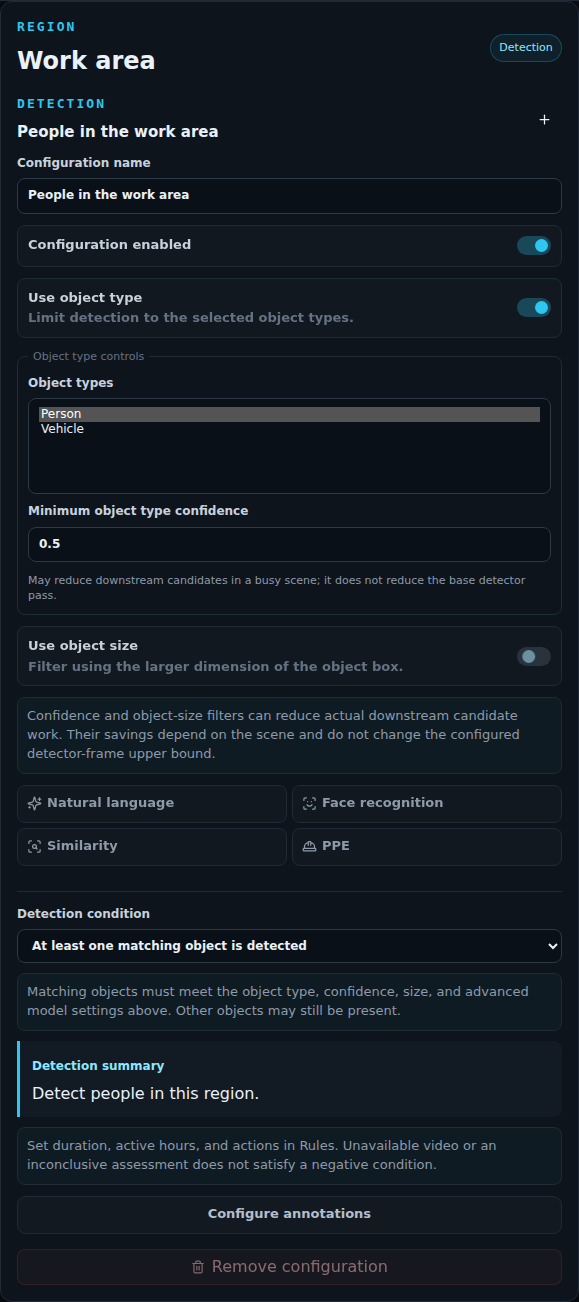
Use additional detection options when your task needs them: a natural-language description, face recognition, similarity to reference images, or PPE. The PPE guide gives a complete missing-gloves example.
2. Choose presence or absence
Section titled “2. Choose presence or absence”| Detection condition | What it means | Example |
|---|---|---|
| At least one matching object is detected | A person or object meeting the configuration is present. | Someone is in the work area. |
| No matching objects are detected | No qualifying objects are detected in the region. | No person is in the work area. |
The condition includes all selected filters. For example, a missing-gloves configuration with a presence condition matches a person missing gloves. With absence selected, it matches when no person missing gloves is detected in the region.
For absence tests, keep the region visible and video current so EyesOnIt can confirm the scene.
3. Set the incident rule
Section titled “3. Set the incident rule”- Open Rules. Edit the existing detection rule, or choose Detection rule to add one.
- Select People in the work area as the Detection configuration.
- Set Rule name to Person in work area and keep Rule enabled on.
- Use these example settings:
| Control | Example | Purpose |
|---|---|---|
| Dwell (s) | 3 | How long a qualifying object must satisfy the condition before its incident starts. |
| Reset (s) | 5 | How long confirmed recovery must hold before the active occurrence ends. |
| Severity | Review | The priority used in the incident queue. |
| Schedule | Always | When the rule is active. |
Check Condition from Detection and Incident name. A custom rule name becomes the incident name; an automatic name follows the detection condition.
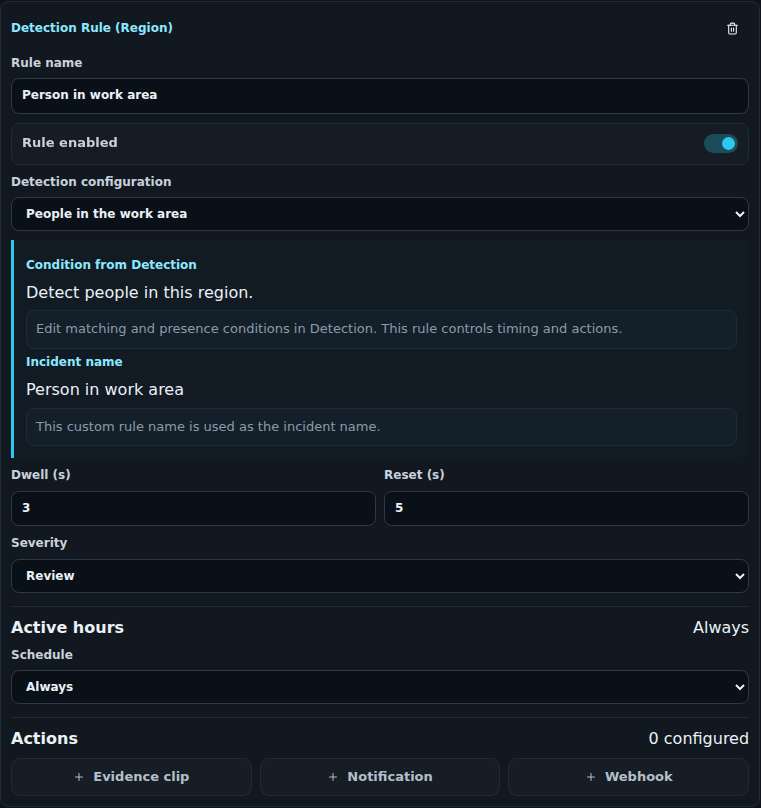
For working hours, choose Custom weekly hours under Schedule. Check the displayed time zone and add the required day/time ranges.
4. Save and test
Section titled “4. Save and test”Choose Save configuration and confirm the save succeeds. Start the camera if needed. Have a person enter the region and remain for the dwell period, then leave to check recovery.
Open Incidents and find the event by its camera and rule name. Equipment confirmation can precede dwell for PPE rules; use the PPE test steps for that workflow.
To notify your team or retain video around the event, add notifications and evidence. Then review the resulting incident.
To target enrolled people or teams, use Face recognition in the detection configuration.
For individual timers and paired events, see Dwell and loitering, Objects together, and Close approach.