
Transfer identities and manage customer access
In the EyesOnIt web UI, use an encrypted package to move enrolled people to another server. On a shared server, use organization access to make an identity available to a customer. These are separate operations. A package carries identity records, groups, and saved face images. The destination provider decides which customers can use them.
Export an encrypted package
Section titled “Export an encrypted package”- Sign in as a provider administrator. Open Administration → Transfers and find Identity transfer. Verify your sign-in when prompted.
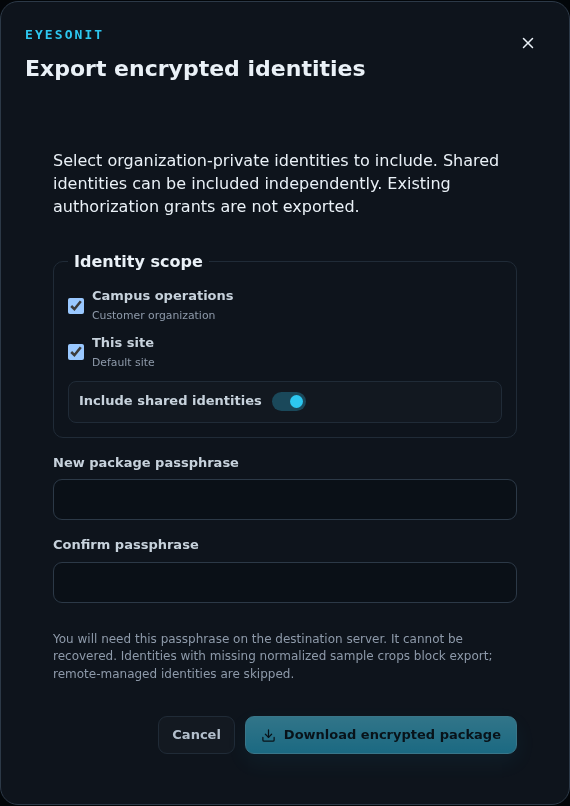
- Choose Export identities. Select the source organizations whose private identities you want. Choose Include shared identities if those records should travel too.
- Enter and confirm a new package passphrase of 12–256 characters. Choose Download encrypted package. Deliver the file to the intended administrator and share the passphrase separately. Keep the passphrase until the destination verifies the import.
The export skips remote-managed records. If a local record lacks a saved normalized face image, resolve the missing sample before repeating the export.
Import and verify
Section titled “Import and verify”- On the destination server, create any needed customer organizations. Open Administration → Transfers → Load identity package, select the encrypted file, enter its passphrase, and choose Inspect package.
- Check the counts for people, groups, and samples. Map every source organization to its intended destination. Under Existing identity behavior, use Merge to preserve existing fields and samples or Replace to use the package fields and samples.
- Choose Preview import. Read each proposed action. Resolve reported conflicts, then preview again. If the plan expires, generate a fresh preview.
- When the preview says Ready to apply, choose Apply merge import or Apply replace import. Check the completion counts. If gallery reconciliation is pending, allow it to finish before testing recognition.
- Open Identities, find an imported person, and check the owner, groups, and samples. Restore intended customer grants separately, then verify from the customer workspace.
Share an identity with a customer
Section titled “Share an identity with a customer”As a provider administrator, open Identities → Add identity. On a server with customer organizations, choose Shared identity managed by EyesOnIt for a record you intend to share. For a private record, choose its owning Organization instead. Follow Enroll people to add a sample.
Select the shared person. Under Organization access, select the intended customer and complete any identity verification prompt. Each checkbox applies its change immediately. Verify that the customer can select the person for face recognition or search. Clear that customer’s checkbox to withdraw access. Review saved targets that depend on the person. Other customers’ grants are independent.

Work with remote-managed records
Section titled “Work with remote-managed records”Look for Remote managed on the group, person, or sample. Make the change in the system that manages that record, then return to EyesOnIt to verify the updated name, memberships, or samples. Use the owning system’s enrollment and removal process for these records. For a local group, removing a membership keeps the person’s other memberships and photos.
Retain or remove a person
Section titled “Retain or remove a person”| Intended change | Action and result |
|---|---|
| Retire one photo | Select the person and use Delete sample on that photo. Review the remaining samples and primary portrait. |
| Remove a group assignment | Open the group and choose Remove from group. The person stays in All identities. |
| Withdraw one customer’s access | Clear the customer’s checkbox under Organization access. The shared record stays in the directory. |
| End enrollment | In All identities, select the intended person, review the names, and choose Delete permanently. This deletes the enrolled photos and removes all memberships. For a batch, review any failures individually. Successful deletions have already taken effect. |
Review enrollment when a person leaves or the reason for retaining their photos ends. Enrolled samples are maintained in Identities. Saved incident records, snapshots, clips, and continuous video follow their own retention and protection settings. Review those separately when a removal request includes historical evidence.